在Lync Control Panel管理介面上,當執行新增使用者帳號會有下面的錯誤訊息:
“Insufficient access rights to perform the operation 00002098: SecErr:DSID-03150A45, problem 4003 (INSUFF_ACCESS_RIGHTS), data 0″
解決方法:
You have to go to Active Directory Users and Computers (with Advanced Features turned on in the View Menu), then go to Properties on the User that you can't enable on Lync, and in the Security tab, clic on Advanced. Then check "Include Inheritable Permissions from this object’s parent", accept and the problem will be instantly solved.
2012年4月4日 星期三

2012年3月31日 星期六
Publishing the Lync Sever EE topology failed
中央管理儲存區 (CMS) 資料庫建立執行在Lync Server後端的SQL Server上,當拓樸設定完成後,正當要發布拓樸時,執行過程中就會發生失敗,並且在Log上回傳下列的錯誤訊息:

發生的原因:
主要是後端SQL Server上的本機Windows防火牆擋住遠端服務連結的通訊埠所造成
解決方法請參照下列步驟,在本機 Windows 防火牆中開啟通訊埠以便存取:
1.在 [控制台] 中,開啟 [網路連線]、以滑鼠右鍵按一下使用中連線,然後按一下 [內容]。
2.按一下 [進階] 索引標籤,然後再按一下 [Windows 防火牆設定]。
3.在 [Windows 防火牆] 對話方塊中,按一下 [例外狀況] 索引標籤,然後按一下 [加入通訊埠]。
4.在 [加入通訊埠] 對話方塊的 [名稱] 方塊中,輸入 SQL Server。
5.在 [通訊埠號碼] 文字方塊中,輸入 Database Engine 執行個體的通訊埠編號,例如預設執行個體的通訊埠編號是 1433。
6.確認已選取 [TCP],然後按一下 [確定]。
7.若要開啟通訊埠以便公開 SQL Server Browser 服務,請按一下 [加入通訊埠],在 [名稱] 文字方塊中輸入 SQL Server Browser,在 [通訊埠編號] 文字方塊中輸入 1434,選取 [UDP],然後按一下 [確定]。
8.關閉 [Windows 防火牆] 和 [內容] 對話方塊。

發生的原因:
主要是後端SQL Server上的本機Windows防火牆擋住遠端服務連結的通訊埠所造成
解決方法請參照下列步驟,在本機 Windows 防火牆中開啟通訊埠以便存取:
1.在 [控制台] 中,開啟 [網路連線]、以滑鼠右鍵按一下使用中連線,然後按一下 [內容]。
2.按一下 [進階] 索引標籤,然後再按一下 [Windows 防火牆設定]。
3.在 [Windows 防火牆] 對話方塊中,按一下 [例外狀況] 索引標籤,然後按一下 [加入通訊埠]。
4.在 [加入通訊埠] 對話方塊的 [名稱] 方塊中,輸入 SQL Server
5.在 [通訊埠號碼] 文字方塊中,輸入 Database Engine 執行個體的通訊埠編號,例如預設執行個體的通訊埠編號是 1433。
6.確認已選取 [TCP],然後按一下 [確定]。
7.若要開啟通訊埠以便公開 SQL Server Browser 服務,請按一下 [加入通訊埠],在 [名稱] 文字方塊中輸入 SQL Server Browser,在 [通訊埠編號] 文字方塊中輸入 1434,選取 [UDP],然後按一下 [確定]。
8.關閉 [Windows 防火牆] 和 [內容] 對話方塊。
2012年3月30日 星期五
To remove protection that prevents an OU from accidental deletion
To remove protection that prevents an OU from accidental deletion
1.Log on to the computer as a member of the Domain Admins group.
2.Open Active Directory Users and Computers.
3.Click View, and then click Advanced Features.
4.First, clear permissions on the OU for which you want to remove protection. To do this, right-click the OU, and then click Properties.
5.In OU Properties, click the Security tab, and then click Advanced.
6.In Permission Entries, select the Deny entry for the Everyone group, and then click Remove.
7.Click OK to close the Advanced Security Settings, and then click OK to close OU Properties.
8.Second, clear permissions on the parent container of the OU for which you want to remove protection. To do this, right-click the parent container, and then click Properties.
9.In ContainerProperties, click the Security tab.
10.In Group or user names, select the Everyone group, and then clear the Deny check box for Delete All Child Objects, and then click OK to close Container Properties.
1.Log on to the computer as a member of the Domain Admins group.
2.Open Active Directory Users and Computers.
3.Click View, and then click Advanced Features.
4.First, clear permissions on the OU for which you want to remove protection. To do this, right-click the OU, and then click Properties.
5.In OU Properties, click the Security tab, and then click Advanced.
6.In Permission Entries, select the Deny entry for the Everyone group, and then click Remove.
7.Click OK to close the Advanced Security Settings, and then click OK to close OU Properties.
8.Second, clear permissions on the parent container of the OU for which you want to remove protection. To do this, right-click the parent container, and then click Properties.
9.In ContainerProperties, click the Security tab.
10.In Group or user names, select the Everyone group, and then clear the Deny check box for Delete All Child Objects, and then click OK to close Container Properties.
2012年3月29日 星期四
Spesified SIP domain (SipDomain) is not valid. Specify a valid SIP domain and then try again
預設的SIP網域跟對外E-Mail不一樣時,在啟用Lync帳號時,就會產生下列錯誤

接著透過拓樸產生器,再新增一筆其他支援的SIP網域,重新啟用帳號時,錯誤訊息就不再產生


接著透過拓樸產生器,再新增一筆其他支援的SIP網域,重新啟用帳號時,錯誤訊息就不再產生

Lync Server 2010 Setup or Remove Lync Components fails on Windows Server 2008 R2 SP1
在執行安裝或者移除 Lync 元件時,會有如下的錯誤訊息

針對錯誤訊息展開後的詳細內容如下

造成的原因
The Lync Server 2010 Setup or Remove Component installation prerequisite check cannot locate the Server 2008 R2 SP1 version of Microsoft Windows Media Format.
解決方法
To resolve this problem, install Windows Desktop Experience. To do this, follow these steps:
1.Click Start, click Administrative Tools, and then double-click Server Manager
2.In Server Manager, click Add Features under Features Summary
3.In the Add Features Wizard dialog box, make sure that the Desktop Experience option is selected
4.Click Next, and then click Install
5.After the installation process is complete, click Close, and then close Server Manager
Note After you install Windows Desktop Experience, you must restart the computer
或者參考下列資料
http://support.microsoft.com/kb/2522454

針對錯誤訊息展開後的詳細內容如下

造成的原因
The Lync Server 2010 Setup or Remove Component installation prerequisite check cannot locate the Server 2008 R2 SP1 version of Microsoft Windows Media Format.
解決方法
To resolve this problem, install Windows Desktop Experience. To do this, follow these steps:
1.Click Start, click Administrative Tools, and then double-click Server Manager
2.In Server Manager, click Add Features under Features Summary
3.In the Add Features Wizard dialog box, make sure that the Desktop Experience option is selected
4.Click Next, and then click Install
5.After the installation process is complete, click Close, and then close Server Manager
Note After you install Windows Desktop Experience, you must restart the computer
或者參考下列資料
http://support.microsoft.com/kb/2522454
2012年3月28日 星期三
Uninstalling Microsoft OCS 2007 R2
My decommissioning steps are detailed below:
1. In the OCS 2007 R2 Administrative Console, expand Standard Edition Servers, expand your servers computer name and then right click the "Users" container and click "Delete Users". Follow the presented wizard to remove all OCS attributes from your SIP enabled user accounts.
Note: This does not delete your Active Directory user accounts, it simply SIP disables the users.
2. Right click your servers computer name and select "Deactivate", then proceed to deactivate each role in the following order. Performing these steps in the incorrect order will impact the uninstallation of the product.
Response Group Service
Outside Voice Control
Conferencing Announcement Service
Conferencing Attendant
Application Host
Application Sharing Server
A/V Conferencing Server
Web Conferencing Server
Web Components Server
Front End Server - If deactivation fails, run this again but check the force option.
3. Once the deactivation is complete, go to the control panel of your server and select either Add/Remove Programs or Programs & Features depending on your operating system version. Proceed and remove the following services in the below order.
Application Host
Application Sharing Server
Audio/Video Conferencing Server
Conferencing Announcement Service
Conferencing Attendant
Outside Voice Control
Response Group Service
Web Conferencing Server
Standard Edition Server (Front-End)
Managed API 2.0 Core 64-bit
Managed API 2.0 Speech x64
Managed API 2.0 Windows Workflow Activities Server Speech Language Pack
OCS 2007 R2 Administrative Tools
Web Components Server
Core Components
4. Demote your server from the domain and proceed to delete it's Active Directory computer account and its associated DNS A and SRV records.
That's it, you have successfully removed Office Communications Server 2007 R2 from your environment.
1. In the OCS 2007 R2 Administrative Console, expand Standard Edition Servers, expand your servers computer name and then right click the "Users" container and click "Delete Users". Follow the presented wizard to remove all OCS attributes from your SIP enabled user accounts.
Note: This does not delete your Active Directory user accounts, it simply SIP disables the users.
2. Right click your servers computer name and select "Deactivate", then proceed to deactivate each role in the following order. Performing these steps in the incorrect order will impact the uninstallation of the product.
Response Group Service
Outside Voice Control
Conferencing Announcement Service
Conferencing Attendant
Application Host
Application Sharing Server
A/V Conferencing Server
Web Conferencing Server
Web Components Server
Front End Server - If deactivation fails, run this again but check the force option.
3. Once the deactivation is complete, go to the control panel of your server and select either Add/Remove Programs or Programs & Features depending on your operating system version. Proceed and remove the following services in the below order.
Application Host
Application Sharing Server
Audio/Video Conferencing Server
Conferencing Announcement Service
Conferencing Attendant
Outside Voice Control
Response Group Service
Web Conferencing Server
Standard Edition Server (Front-End)
Managed API 2.0 Core 64-bit
Managed API 2.0 Speech x64
Managed API 2.0 Windows Workflow Activities Server Speech Language Pack
OCS 2007 R2 Administrative Tools
Web Components Server
Core Components
4. Demote your server from the domain and proceed to delete it's Active Directory computer account and its associated DNS A and SRV records.
That's it, you have successfully removed Office Communications Server 2007 R2 from your environment.
2012年2月2日 星期四
Windows Phone 8 Apollo 全新功能搶先看!
根據 zdnet 的報導,Microsoft 的下一代行動作業系統 Windows Phone 8 Apollo 的更新項目已經流出,一起來看看下一代 Windows Phone 行動作業系統帶來了什麼驚喜吧!
* 支援多核心處理器
* 支援更多的螢幕解析度
* 支援 MicroSD 卡儲存裝置的拆換
* 支援 NFC 及相關的行動支付應用
* Windows Phone 8 和 Windows 8 作業系統兼容,方便開發人員可使用同一套編碼編寫 Windows 8 及 Windows Phone 8
* 智慧數據追綜,幫助用戶瞭解手機數據傳輸流量
* 更新瀏覽器,以 IE10 取代 IE9
* 支援 BitLocker 進行加密及安全防護功能
* App 對 App 的資料傳輸
* 支援 Skype,但並非整合進手機系統中
* 與電腦的同步不再只能透過 Zune 軟體,將提供更多元的同步方式
Microsoft 一口氣進行這麼多的更新,想必能為未來 Windows Phone 的發展帶來更大的助益;Windows Phone 8 預計在 2012 年的第四季上線,而且 Windows Phone 8 有向下兼容 Windows Phone 7,只是可能有些功能礙於硬體效能的關係會無法支援,但現在手持 Windows Phone 7 作業系統手機的朋友能升級上 Windows Phone 8 應該是確定的事了。
* 支援多核心處理器
* 支援更多的螢幕解析度
* 支援 MicroSD 卡儲存裝置的拆換
* 支援 NFC 及相關的行動支付應用
* Windows Phone 8 和 Windows 8 作業系統兼容,方便開發人員可使用同一套編碼編寫 Windows 8 及 Windows Phone 8
* 智慧數據追綜,幫助用戶瞭解手機數據傳輸流量
* 更新瀏覽器,以 IE10 取代 IE9
* 支援 BitLocker 進行加密及安全防護功能
* App 對 App 的資料傳輸
* 支援 Skype,但並非整合進手機系統中
* 與電腦的同步不再只能透過 Zune 軟體,將提供更多元的同步方式
Microsoft 一口氣進行這麼多的更新,想必能為未來 Windows Phone 的發展帶來更大的助益;Windows Phone 8 預計在 2012 年的第四季上線,而且 Windows Phone 8 有向下兼容 Windows Phone 7,只是可能有些功能礙於硬體效能的關係會無法支援,但現在手持 Windows Phone 7 作業系統手機的朋友能升級上 Windows Phone 8 應該是確定的事了。
2011年12月18日 星期日
Exchange 2010 Outbound Mail Error
郵件可以正常收信但是無法正常發信,錯誤訊息如下:
451.4.4.0 Primary Target IP address responding with : "421.4.4.2 Connection dropped due to a ConnectionReset" Attempted failover to alternate host but did not succeed...
解決方法:
1. 確認DNS名稱解析是否正常
2. Firewall所提供服務Port是否有開啟
3. 在Exchange以及Exchange Edge上用Telnet溝通外部的郵件伺服器看看
*如果上述的動作都檢查了,另外第三步驟也確認無法與外部的郵件伺服器溝通,那可能您的ISP廠商有將服務線路過濾SMTP 25 Port所造成的,請ISP廠商線路重整,此問題即可解決.
451.4.4.0 Primary Target IP address responding with : "421.4.4.2 Connection dropped due to a ConnectionReset" Attempted failover to alternate host but did not succeed...
解決方法:
1. 確認DNS名稱解析是否正常
2. Firewall所提供服務Port是否有開啟
3. 在Exchange以及Exchange Edge上用Telnet溝通外部的郵件伺服器看看
*如果上述的動作都檢查了,另外第三步驟也確認無法與外部的郵件伺服器溝通,那可能您的ISP廠商有將服務線路過濾SMTP 25 Port所造成的,請ISP廠商線路重整,此問題即可解決.
2011年11月12日 星期六
使用AD GPO部署Lync Client
解決方法:
透過Windows Active Directory Domain的Group Policy來部署Lync Client有下列三大步驟:
* 取得Lync.msi的封裝檔案
* 替需要部署的用戶端新增加UseMSIForLyncInstallation (DWORD)的Registry Key
* 建立Windows Active Directory GPO部署Lync.msi檔案
另外,您可以參考下列整理的參考資訊:
取得Lync.msi的封裝檔案:
請先找一台Windows Client安裝完整的Lync Client軟體,完成安裝後,可以在%Program Files%\OCSetup\ 或 %Program Files(x86)%\OCSetup 的目錄中取得Lync.msi的封裝檔案。
替用戶端增加Registry Key以允許Lync.msi封裝檔的部署:
請參考知識庫文件中的說明:http://support.microsoft.com/kb/2477965/en-us 替每一台需要部署Lync Client的Windows用戶端新增加UseMSIForLyncInstallation (DWORD)值為1的Registry Key。

您可以參考下列文件為每一台Windows Client增加上述的Registry Key。
How to add, modify, or delete registry subkeys and values by using a registration entries (.reg) file
http://support.microsoft.com/kb/310516/en-us
Distributing Registry Changes
http://technet.microsoft.com/en-us/library/bb727154.aspx
透過Active Directory Group Policy部署Lync.msi:
透過AD GPO部署應用程式的作法您可以參考下列知識庫文件中的說明:
How to use Group Policy to remotely install software in Windows Server 2003 and in Windows Server 2008
http://support.microsoft.com/kb/816102/en-us
How to use Windows Installer and Group Policy to deploy the VPModule.msi in an Active Directory domain
http://support.microsoft.com/kb/887405/en-us (請將此案例中的VPModule.msi替換成Lync.msi)
How to assign software to a specific group by using Group Policy
http://support.microsoft.com/kb/302430/en-us
透過Windows Active Directory Domain的Group Policy來部署Lync Client有下列三大步驟:
* 取得Lync.msi的封裝檔案
* 替需要部署的用戶端新增加UseMSIForLyncInstallation (DWORD)的Registry Key
* 建立Windows Active Directory GPO部署Lync.msi檔案
另外,您可以參考下列整理的參考資訊:
取得Lync.msi的封裝檔案:
請先找一台Windows Client安裝完整的Lync Client軟體,完成安裝後,可以在%Program Files%\OCSetup\ 或 %Program Files(x86)%\OCSetup 的目錄中取得Lync.msi的封裝檔案。
替用戶端增加Registry Key以允許Lync.msi封裝檔的部署:
請參考知識庫文件中的說明:http://support.microsoft.com/kb/2477965/en-us 替每一台需要部署Lync Client的Windows用戶端新增加UseMSIForLyncInstallation (DWORD)值為1的Registry Key。

您可以參考下列文件為每一台Windows Client增加上述的Registry Key。
How to add, modify, or delete registry subkeys and values by using a registration entries (.reg) file
http://support.microsoft.com/kb/310516/en-us
Distributing Registry Changes
http://technet.microsoft.com/en-us/library/bb727154.aspx
透過Active Directory Group Policy部署Lync.msi:
透過AD GPO部署應用程式的作法您可以參考下列知識庫文件中的說明:
How to use Group Policy to remotely install software in Windows Server 2003 and in Windows Server 2008
http://support.microsoft.com/kb/816102/en-us
How to use Windows Installer and Group Policy to deploy the VPModule.msi in an Active Directory domain
http://support.microsoft.com/kb/887405/en-us (請將此案例中的VPModule.msi替換成Lync.msi)
How to assign software to a specific group by using Group Policy
http://support.microsoft.com/kb/302430/en-us
2011年11月1日 星期二
直接在 Windows 7 中燒錄 ISO 映像檔
使用方法:
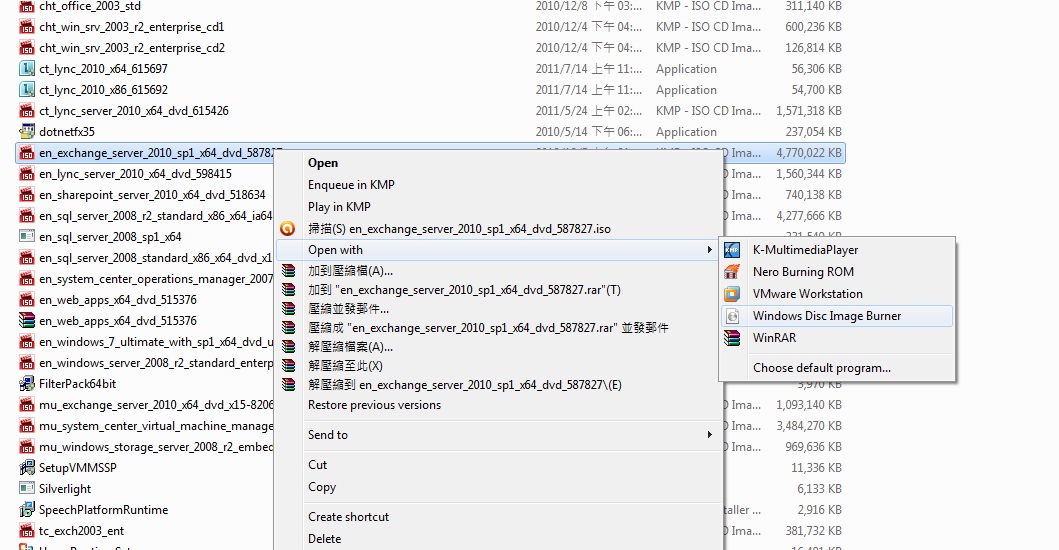
1. 將光碟映像檔下載回來後,直接在檔案上按一下滑鼠右鍵,再點「開啟檔案」→「Windows 光碟映像燒錄程式」,即可用 Windows 7 內建的燒錄工具執行光碟燒錄工作。

2. 在「光碟燒錄機」選單中點選你的燒錄機,然後再按下「燒錄」按鈕,即可開始燒錄光碟。燒錄完成後,光碟機的托盤會自動打開,拿出光碟按「關閉」即可完成。

1. 將光碟映像檔下載回來後,直接在檔案上按一下滑鼠右鍵,再點「開啟檔案」→「Windows 光碟映像燒錄程式」,即可用 Windows 7 內建的燒錄工具執行光碟燒錄工作。
2. 在「光碟燒錄機」選單中點選你的燒錄機,然後再按下「燒錄」按鈕,即可開始燒錄光碟。燒錄完成後,光碟機的托盤會自動打開,拿出光碟按「關閉」即可完成。

目的地端伺服器目前拒絕複寫要求
錯誤訊息如下:

解決方法:
試試看檢查下面幾項動作
1.Netlogon Service有沒有啟動或者服務重新啟動
2.是否有此值 HKLM\System\CCS\Services\NTDS\Parameters 底下的 "DSA Not Writable" .. 有的話把他刪除&重新開機
3.確定 repadmin /options dc1 是否還會有該兩項選項..有的話嘗試用先前的指令在試試看
repadmin /options DC1 -DISABLE_INBOUND_REPL
repadmin /options DC1 -DISABLE_OUTBOUND_REPL
4.確定 repadmin /options dc2 是否還會有該兩項選項..有的話嘗試用先前的指令在試試看
repadmin /options DC2 -DISABLE_INBOUND_REPL
repadmin /options DC2 -DISABLE_OUTBOUND_REPL
5.拒絕複寫要求的問題解決

解決方法:
試試看檢查下面幾項動作
1.Netlogon Service有沒有啟動或者服務重新啟動
2.是否有此值 HKLM\System\CCS\Services\NTDS\Parameters 底下的 "DSA Not Writable" .. 有的話把他刪除&重新開機
3.確定 repadmin /options dc1 是否還會有該兩項選項..有的話嘗試用先前的指令在試試看
repadmin /options DC1 -DISABLE_INBOUND_REPL
repadmin /options DC1 -DISABLE_OUTBOUND_REPL
4.確定 repadmin /options dc2 是否還會有該兩項選項..有的話嘗試用先前的指令在試試看
repadmin /options DC2 -DISABLE_INBOUND_REPL
repadmin /options DC2 -DISABLE_OUTBOUND_REPL
5.拒絕複寫要求的問題解決
訂閱:
文章 (Atom)
-
 錯誤訊息如下: 解決方法: 試試看檢查下面幾項動作 1.Netlogon Service有沒有啟動或者服務重新啟動 2.是否有此值 HKLM\System\CCS\Services\NTDS\Parameters 底下的 "DSA Not Writable...
 -
 將近 4.7 TB 的資料庫,目前有查詢效能低落,及無法查詢大量資料的狀況,雖然已經建議用戶先著手解決地端的效能問題,但客戶想瞭解 Azure 是否有合適的服務方案,可將現有資料庫的資料移轉到雲端,並且能提昇查詢效能及大量資料的儲存方案 當您擁有大量數據(超過 ...